If you enjoyed this lesson, be sure to check out the FULL “Drawing Fundamentals Made Simple” course.
You’ll get tons of additional lessons and step-by-step exercises that will guide you through all the basics of drawing.
So, if you’re ready to improve your drawing skills, click below and enroll today!
Lesson Details
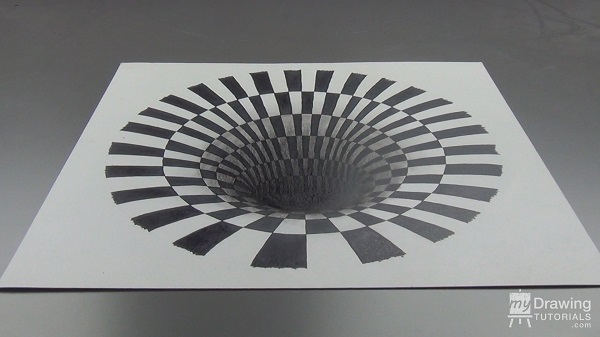
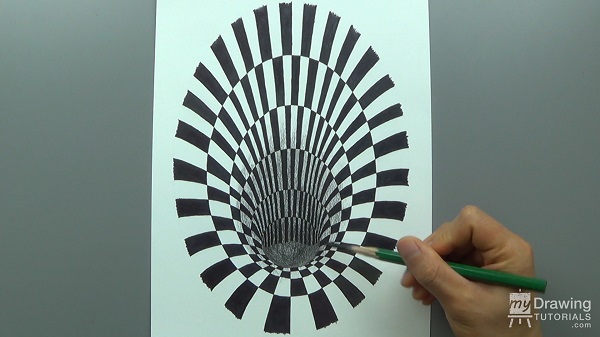
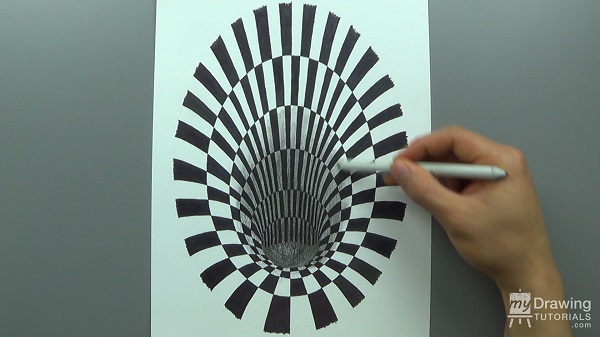
Hi, this is Ethan Nguyen for My Drawing Tutorials.com and in this video, I’m going to show you how to draw a 3D hole optical illusion. Here’s what the illusion will look like.
Now let me show you how I did it.
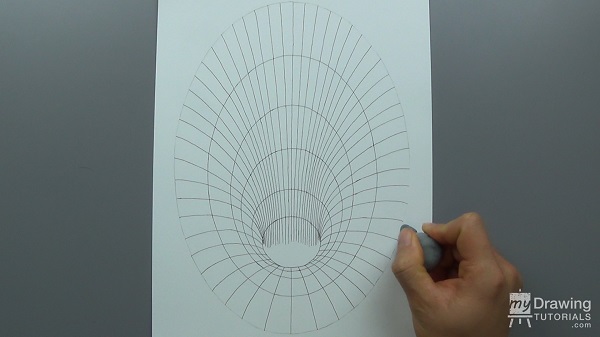
Step 1 – Drawing the Ellipses
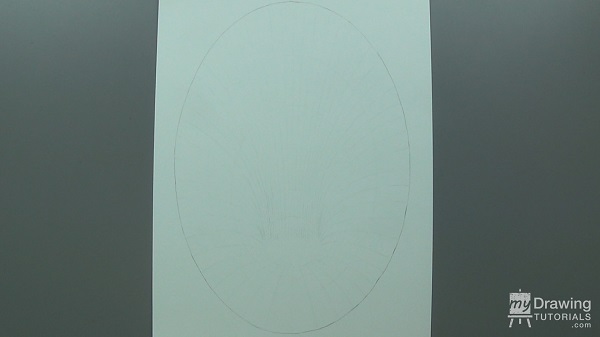
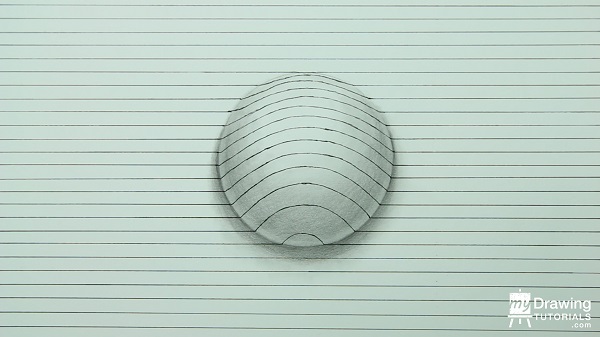
The first step is to draw a big ellipse. The rest of the drawing will be done in ink, but I will draw this first ellipse in pencil because we will be erasing it later.
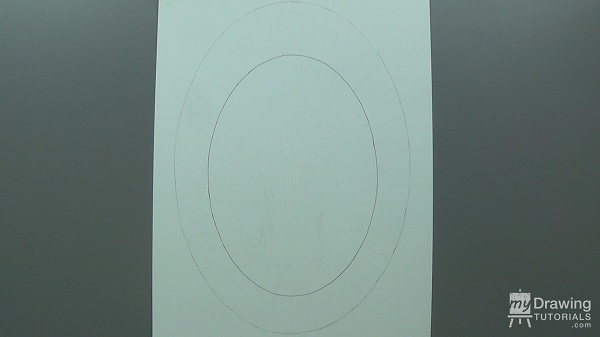
Next, draw a smaller ellipse inside the first one using ink. You’ll want to make this one slightly shorter and more rounded. And instead of placing it right in the center, move it down slightly.
By the way, I made a light pencil sketching of the entire drawing before hand and is now simply going over it with ink. That way, the drawing process will be a lot smoother and you won’t have to see me erasing and re-drawing a bunch of times.
But when you’re drawing this yourself, don’t be afraid to change things around a bunch of times to get the curves just right.
Then draw another smaller ellipse inside this one. Again, you’ll want to make it more rounded and place it closer towards the bottom.
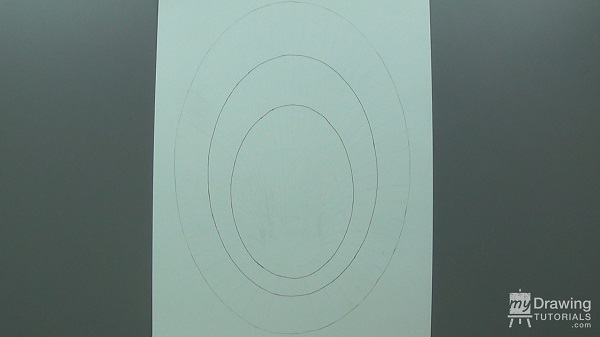
Repeat this process three more times.
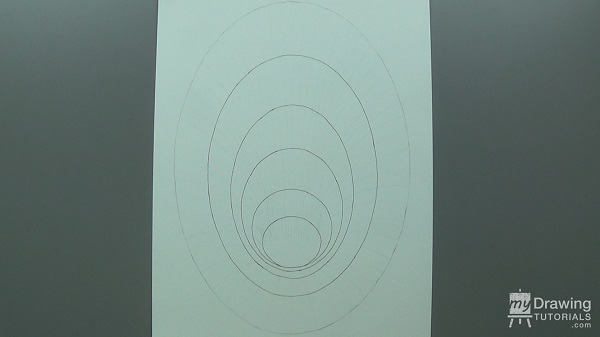
You can see the pattern very clearly here. Each ellipse is a little more like a circle and they group together at a single point.
Step 2 – Drawing the Tiles
Next, we’re going to draw some straight lines from the center outward.
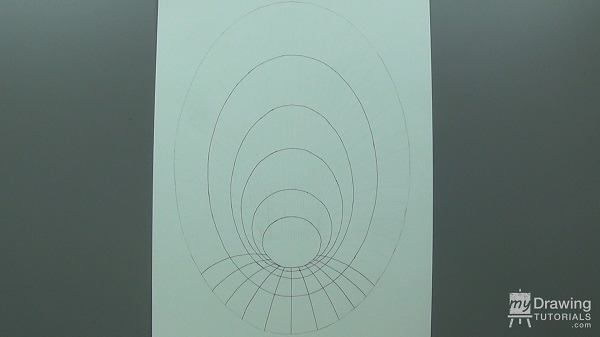
The gaps between these lines will be widest at the bottom and gradually narrow as they move upwards.
To help planing out the spacing and make them more consistent, I like to start at both ends at the same time. That way I’ll have a good idea of how wide the stripes at the top will be and plan accordingly.
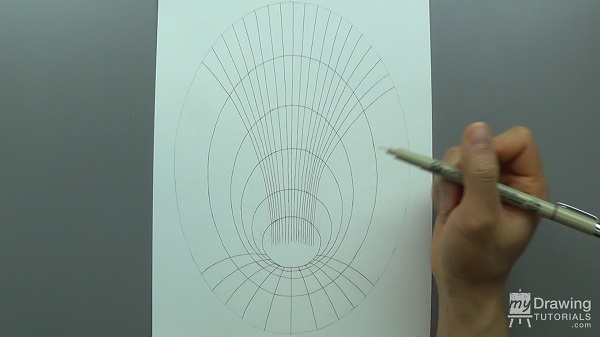
One important detail is to make sure you end up with an even number of stripes. You’ll see why this is important in a minute.
Once we have all the stripes drawing in, let’s erase the outer most circle.
Step 3 – Inking and Shading
Now, we’ll use a sharpie marker to fill in the outer circle using an alternating pattern. This is why it’s important to have a even number of stripes. If the stripes were odd, it would throw the pattern out of sync.
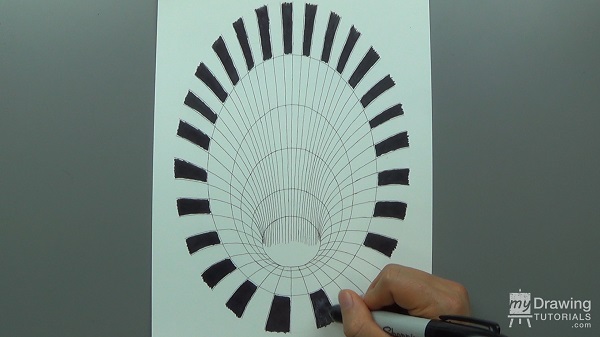
The large sharpie marker won’t be able to color in the squares all the way to the edge, so we’ll just go as close to the edge as we can for now.
Continue doing this for all the circles.
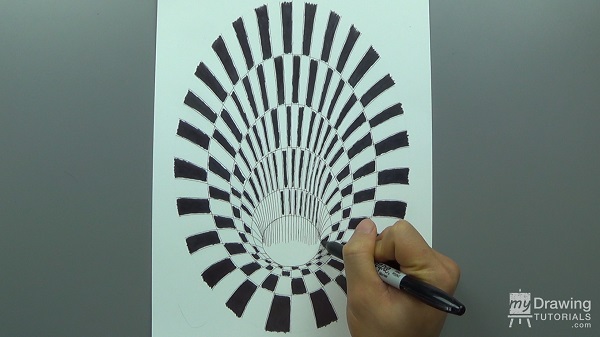
Now, let’s take a smaller pen and fill in the small gaps that we couldn’t get with the larger marker.
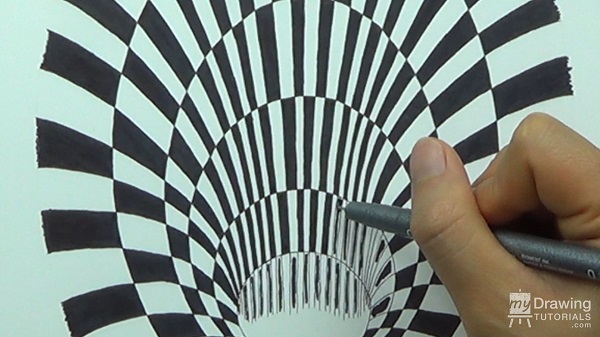
The last step is to create a dark gradation at the center hole. I’ll use a 9xxb graphite pencil to put in a base tone. You also can use a 4B or 6B pencil for this.
And I’ll use a blending stump to smooth out the tone.
And now I’ll use a charcoal pencil to put in a really dark layer for the hole.
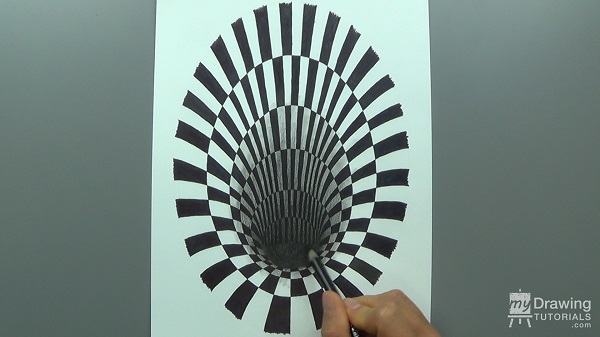
And that’s it! Now all we have to do is look at this drawing at an angle to see the 3D optical illusion.
If you enjoyed this lesson, be sure to check out the FULL “Drawing Fundamentals Made Simple” course.
You’ll get tons of additional lessons and step-by-step exercises that will guide you through all the basics of drawing.
So, if you’re ready to improve your drawing skills, click below and enroll today!


I dont get it???
I did better than all of you ❤️❤️❤️🤫😩💕
Nu Uh
No way, i did it the LEONARDO DA VINCI
it didn’t work 😭
good work btw
i drew the exact same HEEEEEEEEEEEEEEEEEEEEEEEEEEEEEEEEEEEEEEEEEEEEEEEEEEEEEEEEEEEEEEEEEEEEEEEEEEEEEEEEEEEEEEEEEEEEEE!!!!!!!!!!!!!!!!
WHY IS SO HARD
Lmao
no way jose
Bata bust…. 😏😏😏😏
OMG this is so fun i did this for school and its so hard but worth it. i dont have charcoal but i used a black pencil. i got an a and brung my bad b up
Bruh that was so easy . totally worth it>
fr
this is a really good sketch for my sped cousin! He is really smart but also really freaky! Love this! He really sucks good! Thanks again!
this is eas
I love this! I tried it and I told my 3 year old sister that I was going to throw her very tiny stuffed animal down it and she believed it! It was hilarious!!! She started crying and when I dropped it onto the paper she was screaming bloody murder. 10/10 recommended to prank your siblings.
Oh golly oh gosh! That’s a silly trick!!! I should try to throw my stepmom’s rubber cucumbers down there and tell my stepmom about this!😃 That was also a nifty trick! My step-mom is not gonna be happy about this😅!
Lol!
Oh Fiddlesticks! I tried this on my 12-year-old son and he had white stuff all over him! He was like “Mom, get out of here!!” but he’s just trying to prank me! 11/10 Definitely recommend!!😅
how nice is that
i was horrible lol
huh
i did it… it looks like a black blob on the paper lol
Ye I know lol
I wasn’t worth it its stupid it never worked
exactly its to hard for a fourth grader to draw this 0.000000000000000000000000000000000000000000000000000000000000000000000000000000000000000000000000000000000000000000000000000000000000000000000000000001 star rating for this
Im in middle and its also hard
wish i could draw like that
so cool
ME TOOOOOOOO!!!!!!!!!!!!!!!!!!!!!!!!!!!!!!!!!
same
My turned out ugly 😂 lol
I can’t watch the video but I saw the photo. That’s PRETTY good!
oh, REALLY GOOD!
ok
Same, I understand and I will try to draw it
Same here
Cool i love this
awsom
Can you do a drawing on the Titanic
I want you to do a drawing on the Titanic.
I like drawing and because I am in labour and about to give birth I thought that colouring might help me get through the pain of my labour but this just made me very very stressed and how I have just given birth to a 8lb baby
how old are you when this happend
bro
I do not know
So overconfident miss
I am Jayla.For some reason I am batter then you!👩🎨💏😬
Very cool
better
I am better than you
rude
Okay buddy
O my god so good but so hard to make l gets ***** 5 stars
???
you have no proof
Sew match batter
thank’s for it i’ll will sure get a good grade for my art class!!!!
…
ya it is
it is hard
ur right
ya it is i messed up🥰
no its not that hard
it really good for a start and
actually amazing!
it is kind of hard to me
Same
ditto
I can’t stop looking at it lol 😲
Awesome drawing can’t even get past 1st step without messing up tho 😐
The more i look at t the more dizzy I get!
Good
how late you sleep
Yeah
Wow
thank you, this is really ace! at the age of 65, i’m now teaching my self, ie you are teaching me, too shy to go to classes!
Hi
Wassup
ThisIt’s rubbish
This was a load of swill I am very cross because I am in labour and about to give birth I find drawing very relaxing but this is very very stressful
It is not,
cool this is a very good drawing Good job Ethan Nguyen
the drawing used ovals but at the end it was circular.Why?
camera angle dude
the point of view of the viewer
That’s called perspective.
J
because he turned the pic sideways -_-
No.
When u draw an oval on a paper and look at it on an angle it becomes a circle.it just depends on where you look at it from.did you ever see stop or yield painted on the street? If you stand directly over top of them the letters are very long and stretched out but when driving up to them they look normal because you are looking at them from the side or angle.your welcome
lovethis!totally trying this in the future
I already made the hole. Thanks for your help.
chick leg bis
Holy shit, it I’d very hard for me but I know I would get it if I practice it a lot
Patience my dear
watch your profanity
How does he make his circles so round?
Incredible but it takes a LOT of patience :o)
Thank you! Yes, it absolutely does. This drawing took me a whole day and a half. It’s not all that hard, but I had to take a lot of breaks. All the inking and shading was very tedious.
how do you do that
Cow
K
Staring out with large blocks on bottom and reducing them as you move upward is the real challenge; must have erased 6 times!
Bro u spelt starting wrong
sarting
no it dont stupeehhhhd